There are many methods to achieve this, and you can check the OpenWrt Debricking guide for the other methods. However this post is a combination of all the bits of information and data I collected and hopefully it will quickly help someone out there with this particular problem.
Pre-requisites

2. Prepare your USB-to-UART serial adapter. You can use these detailed instructions here to prepare the USB-to-UART serial adapter, or you can just use my instructions here;
- Cut your CA-42 or DKU-5 cable as follows - this enables you to map the pins to the wires; In my case, I had very different colors and you may as well not have the same colors as the image below. The most important thing to know is which wire goes to which pin. Use a multi-meter to measure the continuity of the pins to the wires.

- Map pins to the colors. The pinout looks like this; Your wires of interest are pins 4,6,7 and 8. Ignore the rest of the wires.
In my case, the pin-wire colour was as follows;
PIN 4 -> GREEN (3.3v out)
PIN 6 -> WHITE (RS232 - 3v phone RX Data
PIN 7 -> BLUE (RS232 - 3v phone TX Data
PIN 8 -> BLACK (RS232 - 3v GND
- identify where your serial joints are on the router. Mine were as below;
- Solder the CA-42 or DKU-5 to the serial as follows. Remember the exact pin-color mapping from previous section;

- Solder the 4.7k resistor between the first and last joint pint as follows; (you may not need this resistor - I tried to remove it and still the serial connection was still stable so you might not need it at all)

At this point you've prepared your router for debricking.
Plug in the USB-to-UART cable you just created to your computer's USB port. Important: I have only tested this on a USB 3.0 and a USB 2.0 port. Warning: Once or twice I got the BSOD on my windows 7 when i plugged in the router but most of the times there were no problems.
Be sure to have installed the drivers that come with the CA-42/ DKU-5.
Once you plug in the cable, go to the device manager and you shall see the "Prolific USB-to-Serial Comm port (COMn)" where n can be any number that your computer will assign your device. In my case, it was COM7 as shown below; Take note of the COM port, you'll need it for later.

Next you shall need to change the "Prolific USB-to-Serial Comm port" settings. Right click on it, go to properties, click on the "Port Settings" and set the following values;

Click "Ok" and close the window.
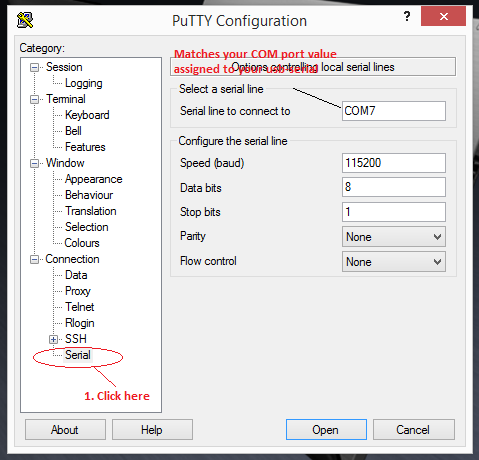
Next you need to open putty and match those settings in your device as seen below;
Once you click "Open", then you should see the router's console.
While the router is connected to your computer using the usb-serial cable we just created, then power the device off, then on again, while device boots, (within 1-2 seconds) you need to be on the putty window typing the word "tpl". YOU MUST BE VERY FAST!! If you successfully log in, you should see the below screen;

Now you need to copy the factory firmware to the router. To do that, you need to use the previously downloaded tftpd server .

There is a less tedious way to debrick these routers. I got this from a commenter named "vivoizer dialer" on my youtube video on the same.
See his solution here:
"I gone through brick issue as configure the openwrt for testing, the TL-MR3420 TP-link router, but recovered through TFTP server it quit easy no need for console port an, use the solarwinds TFTP(i am using since 15-18 years now) TFTP server, now change the firmware name to mr3420v2_tp_recovery.bin, connect router and computer on single Ethernet straight back-2-back cable, change ip address of computer 192.168.0.66/255.255.255.0 without putting any gateway address, now switch-off all the computer firewall options on the computer Ethernet port, as TFTP required udp 69 port to access, but anyway if the firewall is not blocking the port then it is ok. Setup from solarwinds TFTP menu, the server directory where file mr3420v2_tp_recovery.bin is saved. Hold the Tplink router rest button before switching on the Tplink router router and you will see that 192.168.0.88 will access the file after you see message on the TFTP with name of the file mr3420v2_tp_recovery.bin recovered, then release Router rest button, change computer ip address to "obtain Ip address" switch off the router and switch it on, and here you are getting the new ip address on the computer and router LED will be stable now you can login with the new ip address through web.
I did it these by wireshark it shows me the router is looking for TFTP server recovery file with ip address 192.168.0.66, the file name mr3420v2_tp_recovery.bin I read some time back from some form for another tp-link router recovery, it took all about 12 hour to search read configure and solve. I thought if someone is having the same problem so it can help little.
Regards"
Pre-requisites
- CA-42, DKU-5 or similar containing the PL-2303 chip and the drivers. This is for creating a USB-to-UART serial adapter. Image below

Nokia CA-24 Cable. Make sure you get the drivers.
Shouldn't cost more than KES 500 - 4.7k resistor (With MR3220 v1.2 and CA-42 you do not need any resistor) Mine was v2
- 2 Insulated thin wires about 6 cm long
- TCP cable - crossover.
- Multimeter (or something to measure current continuity like battery and led)

- Putty/ You can download it from here
- TFTP server. You can download it from here
- Binary of the factory firmware for the router. Download that from the TP-link official site
- Soldering iron with a very thin tip.
- Solder
- Transparent adhesive tape - sellotape
- Screw driver, cutting tools (razor, wire stripper) and any other supporting tools that you may feel will make your job easier like protective gear.
- A positive attitude and patience if you've never done this before.
Steps to follow
1. Open your router and solder joints TP18 to TP38 and TP28 to TP48 using the thin wires (mine were black) as illustrated below;
- Cut your CA-42 or DKU-5 cable as follows - this enables you to map the pins to the wires; In my case, I had very different colors and you may as well not have the same colors as the image below. The most important thing to know is which wire goes to which pin. Use a multi-meter to measure the continuity of the pins to the wires.
- Map pins to the colors. The pinout looks like this; Your wires of interest are pins 4,6,7 and 8. Ignore the rest of the wires.
 |
| Copyright 2008 Timothy Small, Creative Commons licensed. |
PIN 4 -> GREEN (3.3v out)
PIN 6 -> WHITE (RS232 - 3v phone RX Data
PIN 7 -> BLUE (RS232 - 3v phone TX Data
PIN 8 -> BLACK (RS232 - 3v GND
- identify where your serial joints are on the router. Mine were as below;
 |
| Courtesy OpenWrt.org |
- Solder the CA-42 or DKU-5 to the serial as follows. Remember the exact pin-color mapping from previous section;
- Solder the 4.7k resistor between the first and last joint pint as follows; (you may not need this resistor - I tried to remove it and still the serial connection was still stable so you might not need it at all)
At this point you've prepared your router for debricking.
Plug in the USB-to-UART cable you just created to your computer's USB port. Important: I have only tested this on a USB 3.0 and a USB 2.0 port. Warning: Once or twice I got the BSOD on my windows 7 when i plugged in the router but most of the times there were no problems.
Be sure to have installed the drivers that come with the CA-42/ DKU-5.
Once you plug in the cable, go to the device manager and you shall see the "Prolific USB-to-Serial Comm port (COMn)" where n can be any number that your computer will assign your device. In my case, it was COM7 as shown below; Take note of the COM port, you'll need it for later.
Next you shall need to change the "Prolific USB-to-Serial Comm port" settings. Right click on it, go to properties, click on the "Port Settings" and set the following values;
- Bits per second: 115200
- Data bits: 8
- Parity: none
- Stop bits: 1
- Flow control: none
Click "Ok" and close the window.
Next you need to open putty and match those settings in your device as seen below;
Once you click "Open", then you should see the router's console.
While the router is connected to your computer using the usb-serial cable we just created, then power the device off, then on again, while device boots, (within 1-2 seconds) you need to be on the putty window typing the word "tpl". YOU MUST BE VERY FAST!! If you successfully log in, you should see the below screen;
Now you need to copy the factory firmware to the router. To do that, you need to use the previously downloaded tftpd server .
- Rename the downloaded firmware to "code.bin"
- Use a TCP cable to connect your computer to the router (any eth port but not the wan port - i think... double check!)
- Give your computer a static ip: 192.168.1.27 (for MR3420/MR3220 versions v1.x) or 192.168.1.100 (for MR3420/MR3220 versions v2.x)
- Start the tftpd server and make sure the code.bin file you renamed in step 1 is being served by the tftpd server. I failed a few times as you can see on screen shot below, but once you succeed, you should see the message "Sending code.bin to <IP> " where <IP> in my case was 192.168.1.11.
Now you will have successfully debricked your TL-MR3220. You can use the factory firmware or any other that works to move on from there.
I got most of the steps and technical data from this openwrt page, refer to it and the links therein for any clarification.
I got most of the steps and technical data from this openwrt page, refer to it and the links therein for any clarification.
This method should work for any other compatible non-factory firmware e.g one from OpenWrt.
Just to mention - probably for another blog, you can boost the reception of the 3G signal by creating an "antena" for the MF 192 modem. See video here.
Just to mention - probably for another blog, you can boost the reception of the 3G signal by creating an "antena" for the MF 192 modem. See video here.
Enjoy!
2016 Update!
There is a less tedious way to debrick these routers. I got this from a commenter named "vivoizer dialer" on my youtube video on the same.
See his solution here:
"I gone through brick issue as configure the openwrt for testing, the TL-MR3420 TP-link router, but recovered through TFTP server it quit easy no need for console port an, use the solarwinds TFTP(i am using since 15-18 years now) TFTP server, now change the firmware name to mr3420v2_tp_recovery.bin, connect router and computer on single Ethernet straight back-2-back cable, change ip address of computer 192.168.0.66/255.255.255.0 without putting any gateway address, now switch-off all the computer firewall options on the computer Ethernet port, as TFTP required udp 69 port to access, but anyway if the firewall is not blocking the port then it is ok. Setup from solarwinds TFTP menu, the server directory where file mr3420v2_tp_recovery.bin is saved. Hold the Tplink router rest button before switching on the Tplink router router and you will see that 192.168.0.88 will access the file after you see message on the TFTP with name of the file mr3420v2_tp_recovery.bin recovered, then release Router rest button, change computer ip address to "obtain Ip address" switch off the router and switch it on, and here you are getting the new ip address on the computer and router LED will be stable now you can login with the new ip address through web.
I did it these by wireshark it shows me the router is looking for TFTP server recovery file with ip address 192.168.0.66, the file name mr3420v2_tp_recovery.bin I read some time back from some form for another tp-link router recovery, it took all about 12 hour to search read configure and solve. I thought if someone is having the same problem so it can help little.
Regards"
No comments:
Post a Comment